KRISTY'S MINI MENAGERIE

Hello and welcome, anybody who may come across this little blog of mine! I've just started this blog, and plan on focusing on miniatures, animals, and miniature animals. However, I'm also hoping it can be a fun place to talk about just about anything. We'll see.........

Wednesday, April 27, 2011

Another Little Mouse

Here's another little mouse I just finished.  She's carrying a little raspberry.  And again, I made a hat.   I don't know why I'm into hats lately.  :-/


Sunday, April 24, 2011

Thursday, April 21, 2011

A teddy without a critter, LOL

I've always struggled with trying to make the fur on my critters' teddy bears look more "teddy bear-ish", LOL.  So I've spent the last several days working on this little guy, and I hope it's a bit of an improvement though I know I still have a long way to go.  Same with the litte hat - definitely need to experiment more with this, LOL!
I was going to make a little critter to go with him, but after the time spent on him, I think he's on his own.  :-S


Saturday, April 16, 2011

Little Runaway

I just finished this little one inch mouse who's running away from home.  He's got his little hobo stick and a companion to keep him company (tied to a rope for safe keeping, lol ).  So how many of you ran away from home when you were a child?  I did, but never made it more than a couple blocks and a few hours.  :-p


Tuesday, April 12, 2011

An Itty Bitty Teeny Tiny Duck

Why do I do this to myself?  My "comfort zone" is between 3/4 inch to 1& 1/4 inch.  But I personally LOVE the really tiny little miniatures, so I guess that's why I torture myself trying to make them.  I almost gave up on this little one several times, but he kept quacking at me to please finish him, LOL.  And being the Easter season, I had to make him a little Easter treat, a chocolate egg (well half of one, lol), filled with jelly beans.
Taking a decent picture is even harder, which I did finally give up on.  So here are the crappy pictures of my finally finished PITA duckling.


Wednesday, April 6, 2011

The finished "Mousketeer"

Being he's a mouse, I decided his "sword" would be an ordinary household straight pin.  And guess what the hat was?  Oh YESS, major PITA with a capital "P" !!  I even sustained a minor finger injury, but I guess that's not too surprising being the klutz that I am.  


Tuesday, April 5, 2011

Work in Progress...Can you Guess?

Okay, not as bad as the last post of the turtle but still not the most flattering, here is a mouse I'm working on. Of course he needs to be furred which will hopefully be a big improvement. Can anyone guess what I'm attempting to have this little guy doing?


For a Good Laugh....My Very First Sculpt Ever

I thought you might get a kick out of seeing the results of my very first attempt at sculpting.  It's been almost 3 years now (WOW, time flies!!) since I bought my first polymer clay ("Super Sculpey") and attempted to make something with it.  The only paints in the house were some enamel paints my husband had for model cars, planes, etc., so I used that.  My husband wouldn't let me throw this horribly ugly green blob of a turtle away, but I'm kind of glad I didn't because he's my little reminder that there is hope that I can improve with practice and experimentation.  And if anybody else ever feels frustrated with their creations, maybe looking at your first attempt will make you feel better too.  Or you could just look at mine, LOL.

Notice the bizarre shape of it's shell and head.


Here's the bottom, LMAO!  Look at how huge he is!


Why does he have one bulging eyeball???  Looks like a frickin' tumor or something.

Friday, April 1, 2011

Easter Bonnet Bunny

Experimenting is what keeps making minis interesting and fun, don't you agree?  It can also be frustrating as hell and expensive, LOL.  Anyway, I tried some different techniques with this one.  And yes...the bonnet was a PITA!!  But I think it turned out okay.  And best of all, no fabric of any kind was necessary. 


Saturday, March 26, 2011

Ready for Some Puddle Stompin'

I just finished this little one.  Remember when I said it's hard to make clothes from clay without it looking like plastic?  Well, I figured that slickers and galoshes are close enough to plastic that it might actually look okay, LOL. 
Actually I came up with this one when I saw a little toddler in the rain all dressed up in his raincoat, hat and boots....talk about CUTE!!!


Wednesday, March 23, 2011

Egg Sucking Coonie

Well that title almost sounds like I'm name calling or cursing, LOL. But raccoons just LOVE eggs, and somehow they're able to suck the insides of them out leaving the shells still whole with just a small hole. I found this out one time while camping. We woke to find the eggs we planned to have for breakfast were scattered about the campsite. At first I thought the little thieves left some undamaged, until I picked them up to discover they had been sucked dry, lol. So this is why I made this little egg bandit using a drinking straw. :D


Thursday, March 10, 2011

Turtle Riding....Weeeee!

I suppose if you weren't in a hurry to be somewhere, this would be kind of fun.  :-D

Wednesday, March 2, 2011

A little early for Easter but....

...I had bunnies on the brain.  The chick is just 5/8 inch tall and the bunny is 7/8 inch tall.  Again I used Vicky Guile's tutorial for the little basket.  :)


Wednesday, February 23, 2011

Mouse in a Jam


This guy is already spoken for - a little 7/8" tall mouse who has found his way into his mom's homemade jam.  Messy but yummy.  I wonder if a taste of that jam is worth the trouble and bath he'll be in soon.

And the Winner of the Chinchilla is.......


I added a number generator widget to the right of my blog because I didn't want to cut out all the names and take photos of the drawing (in other words, I'm lazy). ----------------------------------------------------------->
Anyway, the number it came up with is 53 which is Patty (MINI BABIES).   Patty was one of the ones whose names I entered twice (i.e. she was actually number 52 and 53) because she's one of my regular followers and always has such sweet things to say.  So congratulations Patty, I know he'll be going to a wonderful home. :)
You can visit Patty's blog here .

Thursday, February 17, 2011

300 FOLLOWERS Chinchilla Give-Away! :)

A tiny gift and a huge thank you to all of you. I really mean that! And I'm not going to make you work to win it this time. Just leave a comment and you'll be included in the drawing. And because I'm especially appreciative of those who comment regularly or often (you know who you are ;)), I think it only fair that your names will be included in the drawing twice. I saw these little chinchillas at a pet store the other day and I couldn't believe how adorable they are. Apparently they love dried fruit, so I made mine eating a dried apricot. Anyway, this little guy will be going home to the person's whose name is drawn. The drawing will be held the evening of Wednesday, February 23rd, so if you're interested in winning this mini chinchilla, just leave a comment before then.
THANKS AGAIN EVERYONE!!!!


Friday, February 11, 2011

Another Pajama Baby

Getting back to the smaller minis, I decided to make another little pajama baby.  I still have mice on the brain though, which is why this time it's a mouse.  I made a little teddy bear for him too.  The bear is 5/8 inch and the mouse is around 1 & 1/8".  Yep, I had to pull out those lovely reading glasses for these guys. :( 


Monday, February 7, 2011

Polymer Clay Walnut Shell Tutorial (as promised)

Okay, this is a very simple project and my first tutorial so no laughing please.  Now why on earth would I want to make a walnut shell, you ask?  Er, good question.  But off the top of my head I can think of a few ideas:
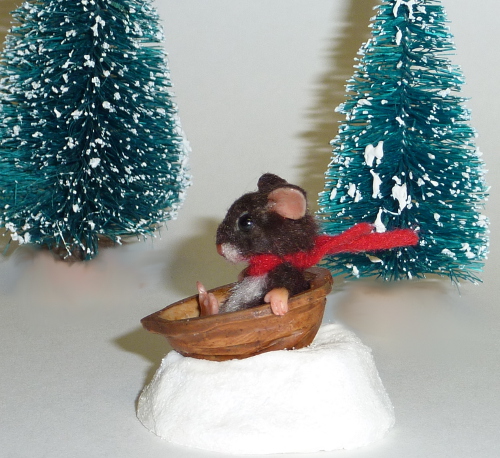
If you make or collect mice, there are a million uses for walnut shells.  For example, a bath tub, a bed, a sled, a crib (as shown below).


And for you Fairy lovers out there, same thing.  In addition to accessories for your wee ones, you could make Christmas ornaments or even a little box by making two halves.
Anyway, since people have asked, here is the tutorial I've promised.


Okay, here goes:
STEP 1:  MAKE A FORMER
You'll need some kind of "former" - something to form the shell around.  If you have something around the house that is the exact size and shape you are looking for, lucky you.  If not, it's easy to make your own former.  Just get some polymer clay.  Doesn't matter what it looks like so if you have a stash of scrap clay like me, now's a good time to use some of it.


To the left is a wooden piece from a craft store, and a hand-made former from scrap clay as an example.  If you use clay, you just need to form with your hands a sort of roundish egg shape, and bake it per the manufacturer's instructions.


 Once cured in the oven, wrap some parchment paper, wax paper or aluminum foil around it.  To keep the paper from coming unwrapped, you can use a little tacky glue to keep it in place.  This picture shows the smaller clay former wrapped in parchment and the larger wooden former wrapped in aluminum foil.


STEP 2: PREPARE THE CLAY FOR THE SHELL
Okay, there are no real rules here.  The type of clay and colors you choose are up to you.  In fact, I have no idea what colors I've used before so I'm just winging it.   This time I chose the following colors: Fimo Desert Sand, Premo Ecru, and Fimo Translucent.  Just find some images of walnut shells on the internet as a reference and I'm sure you can come up with the perfect color!
 Take whatever colors you choose and condition each separately by warming and softening them up with your hands (mush between your fingers, massage, roll into a ball, etc.), then roll each color into a log shape.  Press the logs together and roll this big log between your hands to make one long log.


Fold this log in half and again roll between your hands.  Fold in half again and roll, and repeat this process until the log has fine streaks of color.


Like this!  (Sorry these pictures are SOOOOOO bad - you can click on each one to enlarge them which may help).


Now squash your log into a roundish ball or blob.  If you have a pasta machine for your clay, run it through the machine at the highest setting.  If you don't have a pasta machine, you can use a roller or glass bottle to roll it out flat.  You want a flat even sheet around 1/8 of an inch thick.


STEP 3: FORMING THE SHELL

Carefully lay your clay sheet over your former, and with your fingers gently press it against the former.


 Using a knitting needle, draw an outline of the shell around the former.  If you look at a real walnut shell, it sort of looks like an elongated heart shape.


Then take a craft knife and trim off the excess clay.


Use your knitting needle to smooth and shape the edges.  Again, give it a bit of a heart shape like this.


Now let's make this sucker look like a walnut shell.  Take your knitting needle (you can vary the size of the needle), and make indentations into the clay.  Again, it's helpful to refer to images of a real walnut. 


You want it to end up looking something like this.


Now it's time to cure it in the oven (again according to the manufacturer's instructions). 


 If you need to make sure your shell will stand okay on it's own and not "wobble" or fall over on its side, simply flip the shell over and gently press down to give it a slightly flattened bottom before curing it in the oven.

Once cured, let it cool down for a little bit and then remove the former from the shell.  It should pop off easily, but if necessary you can use a craft knife to gently slip around the edges to loosen it.


If your shell is a bit lopsided looking like mine, lol, just trim and sand around the edges until you acheive the shape you want.


STEP 4: COLORING YOUR SHELL
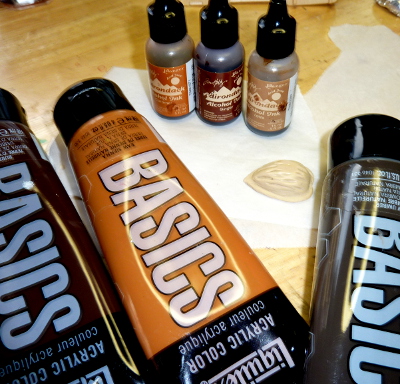
Now that your clay shell is cured and cooled, it's time to give it some color.  You can use acrylic paint and / or alcohol inks.  I use both just for the heck of it.


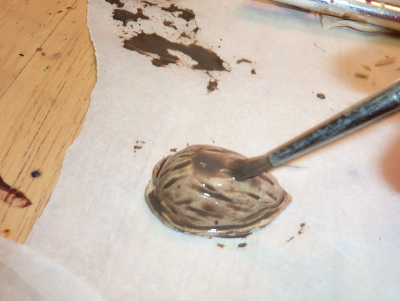
What I do, is mix up a lighter beige-gray-brown color.  I'm going to do a "dry brush" first.  You don't want to wet your brush or water down the paint at all.  Dip your dry brush in the paint and wipe off the excess onto a paper towel or cloth so that there is very little paint left on the brush.


Brush the paint lightly onto your shell and let dry.


Next, you want to make a darker brown color but this time you want to make the paint very very thin and watery.  Brush this darker color over your shell.  The thin darker color will run into the groves of the shell.  If you need to, you can wipe or lightly dab the excess darker paint off of the shell with a paper towel or cloth and let dry.


I think the alcohol inks work best with this sort thing. So here I'm brushing on some "Latte" colored alcohol ink for its last layer of color.


The ink dries very fast so you need to work quickly.  (of course if you screw up, it's easy to remove with some regular rubbing alcohol -not too much though because alcohol will corrode the polymer clay).


Color the inside of the shell basically the same way, but give it a contrasting color to the outer shell (either darker or lighter).


After the paint (and / or ink) has dried thoroughly, apply a light coat of matte varnish as the final step.


Of course the shape, size and color is all up to you.


NOTE:  Another option is to go to the store, buy a walnut, eat the walnut, keep the shell.  But that's not as much fun in my opinion.  :-P